|
文章目录
生命周期旧生命周期新生命周期具体方法详解
生命周期示例——不断获取数据但滚轮的位置固定生命周期示例——时钟
生命周期
组件从创建到死亡它会经历一些特定的阶段。React组件中包含一系列钩子函数(生命周期回调函数), 会在特定的时刻调用。在定义组件时,会在特定的生命周期回调函数中,做特定的工作
旧生命周期
生命周期的三个阶段(旧)  三个阶段: 三个阶段:
初始化(挂载)阶段: 由 ReactDOM.render() 触发——初次渲染
constructor()componentWillMount()render() =====> 必须使用的一个componentDidMount() =====> 常用 一般在这个钩子中做一些初始化的事,例如:开启定时器、发送网络请求、订阅消息 更新阶段: 由组件内部 this.setSate() 或 父组件render 触发
shouldComponentUpdate()componentWillUpdate()render() =====> 必须使用的一个componentDidUpdate() 卸载组件: 由 ReactDOM.unmountComponentAtNode() 触发
componentWillUnmount() =====> 常用 一般在这个钩子中做一些收尾的事,例如:关闭定时器、取消订阅消息
componentReceiveProps:如果父组件导致组件重新渲染,即使props没有更改,也会调用此方法。如果只想处理更改,请确保进行当前值与变更值的比较。
因此,componentReceiveProps并不是由props的变化触发的,而是由父组件的更新触发的
示例:说明组件生命周期的先后顺序 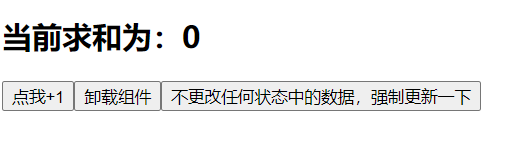
//创建组件
class Count extends React.Component {
//构造器
constructor(props) {
console.log('Count---constructor');
super(props)
//初始化状态
this.state = { count: 0 }
}
//加1按钮的回调
add = () => {
//获取原状态
const { count } = this.state
//更新状态
this.setState({ count: count + 1 })
}
//卸载组件按钮的回调
death = () => {
ReactDOM.unmountComponentAtNode(document.getElementById('test'))
}
//强制更新按钮的回调
force = () => {
this.forceUpdate()
}
//组件将要挂载的钩子
componentWillMount() {
console.log('Count---componentWillMount');
}
//组件挂载完毕的钩子
componentDidMount() {
console.log('Count---componentDidMount');
}
//组件将要卸载的钩子
componentWillUnmount() {
console.log('Count---componentWillUnmount');
}
//控制组件更新的“阀门”
shouldComponentUpdate() {
console.log('Count---shouldComponentUpdate');
return true
}
//组件将要更新的钩子
componentWillUpdate() {
console.log('Count---componentWillUpdate');
}
//组件更新完毕的钩子
componentDidUpdate() {
console.log('Count---componentDidUpdate');
}
render() {
console.log('Count---render');
const { count } = this.state
return (
当前求和为:{count}
this.death}>卸载组件
//构造器
constructor(props){
console.log('Count---constructor');
super(props)
//初始化状态
this.state = {count:0}
}
//加1按钮的回调
add = ()=>{
//获取原状态
const {count} = this.state
//更新状态
this.setState({count:count+1})
}
//卸载组件按钮的回调
death = ()=>{
ReactDOM.unmountComponentAtNode(document.getElementById('test'))
}
//强制更新按钮的回调
force = ()=>{
this.forceUpdate()
}
//若state的值在任何时候都取决于props,那么可以使用getDerivedStateFromProps
static getDerivedStateFromProps(props,state){
console.log('getDerivedStateFromProps',props,state);
return null
}
//在更新之前获取快照
getSnapshotBeforeUpdate(){
console.log('getSnapshotBeforeUpdate');
return 'atguigu'
}
//组件挂载完毕的钩子
componentDidMount(){
console.log('Count---componentDidMount');
}
//组件将要卸载的钩子
componentWillUnmount(){
console.log('Count---componentWillUnmount');
}
//控制组件更新的“阀门”
shouldComponentUpdate(){
console.log('Count---shouldComponentUpdate');
return true
}
//组件更新完毕的钩子
componentDidUpdate(preProps,preState,snapshotValue){
console.log('Count---componentDidUpdate',preProps,preState,snapshotValue);
}
render(){
console.log('Count---render');
const {count} = this.state
return(
当前求和为:{count}
this.death}>卸载组件
199}/>,document.getElementById('test'))
控制台打印结果: 
具体方法详解
1、constructor(props): 如果不初始化 state 或不进行方法绑定,则不需要为 React 组件实现构造函数。
在 React 组件挂载之前,会调用它的构造函数。在为 React.Component 子类实现构造函数时,应在其他语句之前 调用 super(props)。否则,this.props 在构造函数中可能会出现未定义的 bug。
通常,在 React 中,构造函数仅用于以下两种情况:
通过给 this.state 赋值对象来初始化内部 state为事件处理函数绑定实例
在 constructor() 函数中不要调用 setState() 方法。如果组件需要使用内部 state,请直接在构造函数中为 this.state 赋值初始化state:
2、render(): 是 class 组件中唯一必须实现的方法
当 render 被调用时,它会检查 this.props 和 this.state 的变化并返回以下类型之一:
React 元素。通常通过 JSX 创建。例如, 会被 React 渲染为 DOM 节点,会被 React 渲染为自定义组件,无论是 还是 均为 React 元素。数组或fragments。 使得 render 方法可以返回多个元素。欲了解更多详细信息,请参阅fragments 文档。Portals。可以渲染子节点到不同的 DOM 子树中。欲了解更多详细信息,请参阅有关 portals 的文档字符串或数值类型。它们在DOM 中会被渲染为文本节点布尔类型或 null。什么都不渲染。(主要用于支持返回 test && 的模式,其中 test 为布尔类型)
注意: render() 函数应该为纯函数,不进行实际上的渲染动作,它只是一个JSX描述的结构,最终是由React来进行渲染过程。
render函数不应该有任何操作,对页面的描述完全取决于this.props 和 this.state返回的结果。这意味着在不修改组件 state 的情况下,每次调用时都返回相同的结果,并且它不会直接与浏览器交互。可以理解为: UI = render(data)
如需与浏览器进行交互,请在 componentDidMount() 或 其他生命周期方法 中执行你的操作。保持 render() 为纯函数,可以使组件更容易使用、维护。
3、componentDidMount(): 会在组件挂载后(插入 DOM 树中)立即调用。依赖于 DOM 节点的初始化应该放在这里。
如 需通过网络请求获取数据,此处是实例化请求的好地方。
这个方法也是比较适合添加订阅的地方。如果添加了订阅,请不要忘记在 componentWillUnmount() 里取消订阅
可以在 componentDidMount() 里直接调用 setState()。它将触发额外渲染,但此渲染会发生在浏览器更新屏幕之前。如此保证了即使在 render() 两次调用的情况下,用户也不会看到中间状态。
注意: 请谨慎使用该模式,因为它会导致性能问题。通常,应该在 constructor() 中初始化 state。如果你的渲染依赖于 DOM 节点的大小或位置,比如实现 modals 和 tooltips 等情况下,可以使用此方式处理
4、componentDidUpdate(prevProps, prevState, snapshot): 会在更新后会被立即调用。首次渲染不会执行此方法。当组件更新后,可以在此处对 DOM 进行操作。
如果对更新前后的 props 进行了比较,也可以选择在此处进行网络请求。
也可以在 componentDidUpdate() 中直接调用 setState(),但请注意它必须被包裹在一个条件语句里,否则会导致死循环。它还会导致额外的重新渲染,虽然用户不可见,但会影响组件性能。
5、componentWillUnmount(): 会在组件卸载及销毁之前直接调用。
在此方法中执行必要的 清理操作,例如,清除timer,取消网络请求或清除在 componentDidMount() 中创建的订阅等。
componentWillUnmount() 中不应调用 setState(),因为该组件将永远不会重新渲染。组件实例卸载后,将永远不会再挂载它。
生命周期示例——不断获取数据但滚轮的位置固定
getSnapshotBeforeUpdate():在更新之前获取快照 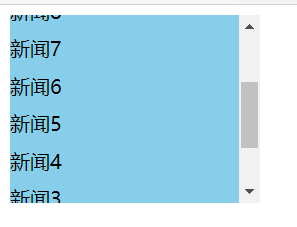
class NewsList extends React.Component{
state = {newsArr:[]}
componentDidMount(){
setInterval(() => {
//获取原状态
const {newsArr} = this.state
//模拟一条新闻
const news = '新闻'+ (newsArr.length+1)
//更新状态
this.setState({newsArr:[news,...newsArr]})
}, 1000);
}
getSnapshotBeforeUpdate(){
return this.refs.list.scrollHeight
}
componentDidUpdate(preProps,preState,height){
this.refs.list.scrollTop += this.refs.list.scrollHeight - height
}
render(){
return(
{
this.state.newsArr.map((n,index)=>{
return n}
})
}
)
}
}
ReactDOM.render(,document.getElementById('test'))
生命周期示例——时钟
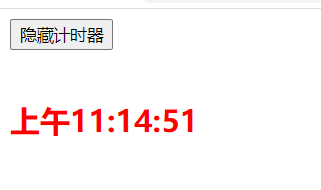
const s2={
color:'red'
}
class Clock extends React.Component{
constructor(props){
super(props);
this.state={
show:true,
date:new Date(),
text:'隐藏'
}
this.handleShow=this.handleShow.bind(this);
}
//定义挂载函数(钩子函数)
componentDidMount(){
this.timerID=setInterval(()=>{this.tick(),1000}); //创建定时器,每隔一秒钟调用一次函数
}
//定义tick函数 更新状态机中的date
tick(){
this.setState({
date:new Date()
})
}
//定义事件响应函数:用来更新状态机中的show和text(决定显示在按钮上的文本)
handleShow(){
this.setState({
show:!this.state.show,
text:!this.state.show?'隐藏':'显示'
})
// this.setState(state=>{
// show:!state.show;
// text:!state.show?'隐藏':'显示'
// })
}
//组件卸载函数(钩子函数):清除定时器
componentWillUnmount(){
clearInterval(this.timerID);
}
render(){
let isShow=this.state.show;
let element;
if(isShow){
element= this.state.date.toLocaleTimeString() }
}else{
element=null;
}
return(
this.state.text}计时器
{ element }
)
}
}
ReactDOM.render(,document.getElementById('myClock'));
|